phase 机制
task phase与function phase
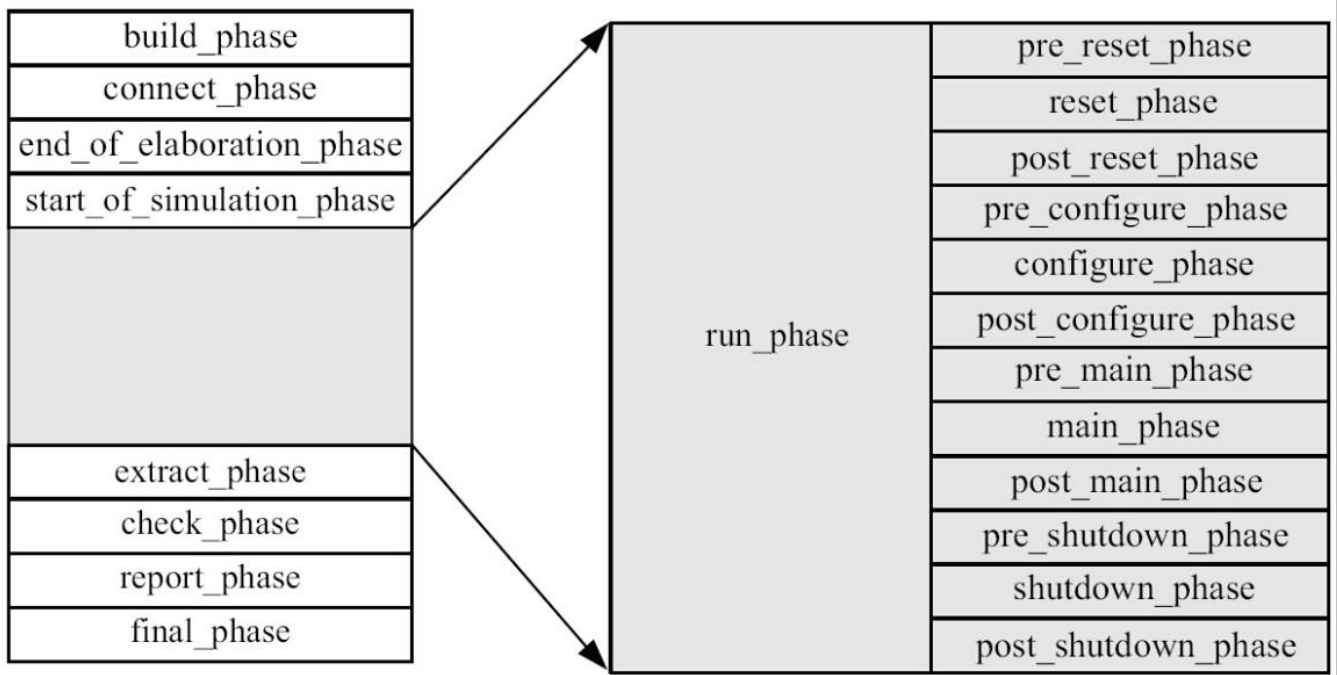
上图所示, 灰色背景所在的是 task phase ( 是耗时的 ), 其余为 function phase ( 不耗时的 )
上述所有的phase 都会按照图中的顺序自上而下自动执行:
 1
 2
 3
 4
 5
 6
 7
 8
 9
10
11
12
13
14
15
16
17
18
19
20
21
22
23
24
25
26
27
28
29
30
31
32
33
|
文件: src/ch5/section5.1/5.1.1/my_case0.sv
class my_case0 extends base_test;
    string tID = get_type_name();
    …
    virtual function void build_phase(uvm_phase phase);
        super.build_phase(phase);
        `uvm_info(tID, "build_phase is executed", UVM_LOW)
    endfunction
    …
    virtual function void start_of_simulation_phase(uvm_phase phase);
        super.start_of_simulation_phase(phase);
        `uvm_info(tID, "start_of_simulation_phase is executed", UVM_LOW)
    endfunction
    virtual task run_phase(uvm_phase phase);
        `uvm_info(tID, "run_phase is executed", UVM_LOW)
    endtask
    virtual task pre_reset_phase(uvm_phase phase);
        `uvm_info(tID, "pre_reset_phase is executed", UVM_LOW)
    endtask
    …
    virtual task post_shutdown_phase(uvm_phase phase);
        `uvm_info(tID, "post_shutdown_phase is executed", UVM_LOW)
    endtask
    virtual function void extract_phase(uvm_phase phase);
        super.extract_phase(phase);
        `uvm_info(tID, "extract_phase is executed", UVM_LOW)
    endfunction
    …
    virtual function void final_phase(uvm_phase phase);
        super.final_phase(phase);
        `uvm_info(tID, "final_phase is executed", UVM_LOW)
    endfunction
endclass
|
运行上述代码, 可以看到各phase被依次执行。
 1
 2
 3
 4
 5
 6
 7
 8
 9
10
11
12
13
14
15
16
17
18
19
20
21
22
23
24
25
|
UVM_INFO @ 0: reporter [RNTST] Running test my_case0...
UVM_INFO /mnt/hgfs/plh_work/example_uvm/puvm/src/ch5/section5.1/5.1.1/my_case0.sv(13) @ 0: uvm_test_top [my_case0] build_phase is executed
UVM_INFO /mnt/hgfs/plh_work/example_uvm/puvm/src/ch5/section5.1/5.1.1/my_case0.sv(18) @ 0: uvm_test_top [my_case0] connect_phase is executed
UVM_INFO /mnt/hgfs/plh_work/example_uvm/puvm/src/ch5/section5.1/5.1.1/my_case0.sv(23) @ 0: uvm_test_top [my_case0] end_of_elaboration_phase is executed
UVM_INFO /mnt/hgfs/plh_work/example_uvm/puvm/src/ch5/section5.1/5.1.1/my_case0.sv(28) @ 0: uvm_test_top [my_case0] start_of_simulation_phase is executed
UVM_INFO /mnt/hgfs/plh_work/example_uvm/puvm/src/ch5/section5.1/5.1.1/my_case0.sv(32) @ 0: uvm_test_top [my_case0] run_phase is executed
UVM_INFO /mnt/hgfs/plh_work/example_uvm/puvm/src/ch5/section5.1/5.1.1/my_case0.sv(36) @ 0: uvm_test_top [my_case0] pre_reset_phase is executed
UVM_INFO /mnt/hgfs/plh_work/example_uvm/puvm/src/ch5/section5.1/5.1.1/my_case0.sv(40) @ 0: uvm_test_top [my_case0] reset_phase is executed
UVM_INFO /mnt/hgfs/plh_work/example_uvm/puvm/src/ch5/section5.1/5.1.1/my_case0.sv(44) @ 0: uvm_test_top [my_case0] post_reset_phase is executed
UVM_INFO /mnt/hgfs/plh_work/example_uvm/puvm/src/ch5/section5.1/5.1.1/my_case0.sv(48) @ 0: uvm_test_top [my_case0] pre_configure_phase is executed
UVM_INFO /mnt/hgfs/plh_work/example_uvm/puvm/src/ch5/section5.1/5.1.1/my_case0.sv(52) @ 0: uvm_test_top [my_case0] configure_phase is executed
UVM_INFO /mnt/hgfs/plh_work/example_uvm/puvm/src/ch5/section5.1/5.1.1/my_case0.sv(56) @ 0: uvm_test_top [my_case0] post_configure_phase is executed
UVM_INFO /mnt/hgfs/plh_work/example_uvm/puvm/src/ch5/section5.1/5.1.1/my_case0.sv(60) @ 0: uvm_test_top [my_case0] pre_main_phase is executed
UVM_INFO /mnt/hgfs/plh_work/example_uvm/puvm/src/ch5/section5.1/5.1.1/my_case0.sv(64) @ 0: uvm_test_top [my_case0] main_phase is executed
UVM_INFO /mnt/hgfs/plh_work/example_uvm/puvm/src/ch5/section5.1/5.1.1/my_case0.sv(68) @ 0: uvm_test_top [my_case0] post_main_phase is executed
UVM_INFO /mnt/hgfs/plh_work/example_uvm/puvm/src/ch5/section5.1/5.1.1/my_case0.sv(72) @ 0: uvm_test_top [my_case0] pre_shutdown_phase is executed
UVM_INFO /mnt/hgfs/plh_work/example_uvm/puvm/src/ch5/section5.1/5.1.1/my_case0.sv(76) @ 0: uvm_test_top [my_case0] shutdown_phase is executed
UVM_INFO /mnt/hgfs/plh_work/example_uvm/puvm/src/ch5/section5.1/5.1.1/my_case0.sv(80) @ 0: uvm_test_top [my_case0] post_shutdown_phase is executed
UVM_INFO /mnt/hgfs/plh_work/example_uvm/puvm/src/ch5/section5.1/5.1.1/my_case0.sv(85) @ 0: uvm_test_top [my_case0] extract_phase is executed
UVM_INFO /mnt/hgfs/plh_work/example_uvm/puvm/src/ch5/section5.1/5.1.1/my_case0.sv(90) @ 0: uvm_test_top [my_case0] check_phase is executed
TEST CASE PASSED
UVM_INFO /mnt/hgfs/plh_work/example_uvm/puvm/src/ch5/section5.1/5.1.1/my_case0.sv(95) @ 0: uvm_test_top [my_case0] report_phase is executed
UVM_INFO /mnt/hgfs/plh_work/example_uvm/puvm/src/ch5/section5.1/5.1.1/my_case0.sv(100) @ 0: uvm_test_top [my_case0] final_phase is executed

--- UVM Report Summary ---
|
在这些phase中, 令人疑惑的是task phase。 对于function phase来说,
在同一时间只有一个phase在执行; 但是task phase中, run_phase和(pre_reset_phase等12个小的phase ( 其中这12 个phase 是按顺序运行))并行运行。
后者称为动态运行( runtime) 的phase。 对于task phase, 从全局的观点来看其顺序大致如下:
 1
 2
 3
 4
 5
 6
 7
 8
 9
10
11
12
13
14
15
16
17
18
19
|
fork
    begin
        run_phase();
    end
    begin
        pre_reset_phase();
        reset_phase();
        post_reset_phase();
        pre_configure_phase();
        configure_phase();
        post_configure_phase();
        pre_main_phase();
        main_phase();
        post_main_phase();
        pre_shutdown_phase();
        shutdown_phase();
        post_shutdown_phase();
    end
join
|
UVM提供了如此多的phase, 在一般的应用中, 无论是function phase还是task phase都不会将它们全部用上。 使用频率最高的
是build_phase、 connect_phase和main_phase。 这么多phase除了方便验证人员将不同的代码写在不同的phase外, 还有利于其他验证
方法学向UVM迁移。 一般的验证方法学都会把仿真分成不同的阶段, 但是这些阶段的划分通常没有UVM分得这么多、 这么细致。
所以一般来说, 当其他验证方法学向UVM迁移的时候, 总能找到一个phase来对应原来方法学中的仿真阶段, 这为迁移提供了便利。
动态运行phase
UVM为什么引入这12个小的phase呢? 分成小的phase是为了实现更加精细化的控制。 reset、 configure、 main、 shutdown四个
phase是核心, 这四个phase通常模拟DUT的正常工作方式, 在reset_phase对DUT进行复位、 初始化等操作, 在configure_phase则进
行DUT的配置, DUT的运行主要在main_phase完成, shutdown_phase则是做一些与DUT断电相关的操作。 通过细分实现对DUT更
加精确的控制。 假设要在运行过程中对DUT进行一次复位( reset) 操作, 在没有这些细分的phase之前, 这种操作要在
scoreboard、 reference model等加入一些额外的代码来保证验证平台不会出错。 但是有了这些小的phase之后, 分别在scoreboard、
reference model及其他部分( 如driver、 monitor等) 的reset_phase写好相关代码, 之后如果想做一次复位操作, 那么只要通过phase
的跳转, 就会自动跳转回reset_phase
phase的执行顺序
UVM 中uvm_component及其派生类变量的实例化是在build_phase中完成的, 假如在其他phase实例化一个uvm_component, 那么系统会报错。
如果是uvm_object的实例化, 则可以在任何phase完成, 当然也包括build_phase了
自上而下执行
如在UVM 树中从树根 uvm_top 自上而下执行
自下而上执行
事实上, 除了build_phase之外, 所有不耗费仿真时间的phase( 即function phase) 都是自下而上执行的。
如对于connect_phase即先执行driver和monitor的connect_phase, 再执行agent的 connect_phase
同一层次的 component 的执行顺序
具有兄弟关系的
component, 如driver与monitor, 它们的执行顺序如何呢?
顺序是按照字典序的。 这里的字典序的排序依据new时指定的名字。
假如monitor在new时指定的名字为aaa, 而driver的名字为bbb, 那么将会先执行monitor的build_phase。 反之
若monitor为mon, driver为drv, 那么将会先执行driver的build_phase。 如下面的代码:
 1
 2
 3
 4
 5
 6
 7
 8
 9
10
11
12
13
14
15
16
17
|
文件: ch5/section5.1/5.1.3/brother/my_env.sv
class my_env extends uvm_env;

    A A_inst0;
    A A_inst1;
    A A_inst2;
    A A_inst3;
    …
    virtual function void build_phase(uvm_phase phase);
        super.build_phase(phase);
        A_inst0 = A::type_id::create("dddd", this);
        A_inst1 = A::type_id::create("zzzz", this);
        A_inst2 = A::type_id::create("jjjj", this);
        A_inst3 = A::type_id::create("aaaa", this);
    endfunction
    `uvm_component_utils(my_env)
endclass
|
其中A 代码:
 1
 2
 3
 4
 5
 6
 7
 8
 9
10
11
12
|
文件: ch5/section5.1/5.1.3/brother/A.sv
class A extends uvm_component;
    …
endclass
function void A::build_phase(uvm_phase phase);
    super.build_phase(phase);
    `uvm_info("A", "build_phase", UVM_LOW)
endfunction
function void A::connect_phase(uvm_phase phase);
    super.connect_phase(phase);
    `uvm_info("A", "connect_phase", UVM_LOW)
endfunction
|
输出结果为:
1
2
3
4
5
6
7
8
|
# UVM_INFO A.sv(16) @ 0: uvm_test_top.env.aaaa [A] build_phase
# UVM_INFO A.sv(16) @ 0: uvm_test_top.env.dddd [A] build_phase
# UVM_INFO A.sv(16) @ 0: uvm_test_top.env.jjjj [A] build_phase
# UVM_INFO A.sv(16) @ 0: uvm_test_top.env.zzzz [A] build_phase
# UVM_INFO A.sv(21) @ 0: uvm_test_top.env.aaaa [A] connect_phase
# UVM_INFO A.sv(21) @ 0: uvm_test_top.env.dddd [A] connect_phase
# UVM_INFO A.sv(21) @ 0: uvm_test_top.env.jjjj [A] connect_phase
# UVM_INFO A.sv(21) @ 0: uvm_test_top.env.zzzz [A] connect_phase
|
这里可以清晰地看出无论是自上而下( build_phase) 还是自下而上( connect_phase) 的phase, 其执行顺序都与实例化的顺序
无关, 而是严格按照实例化时指定名字的字典序
同一个 component 的执行顺序
对于同一component来说, 其12个run-time的phase是顺序执行的,
但是它们也仅仅是顺序执行, 并不是说前面一个phase执行完就立即执行后一个phase
A 代码:
 1
 2
 3
 4
 5
 6
 7
 8
 9
10
11
12
13
14
15
|
文件: src/ch5/section5.1/5.1.3/phase_wait/A.sv
task A::main_phase(uvm_phase phase);
    phase.raise_objection(this);
    `uvm_info("A", "main phase start", UVM_LOW)
    #100;
    `uvm_info("A", "main phase end", UVM_LOW)
    phase.drop_objection(this);
endtask
task A::post_main_phase(uvm_phase phase);
    phase.raise_objection(this);
    `uvm_info("A", "post main phase start", UVM_LOW)
    #300;
    `uvm_info("A", "post main phase end", UVM_LOW)
    phase.drop_objection(this);
endtask
|
B 代码:
 1
 2
 3
 4
 5
 6
 7
 8
 9
10
11
12
13
14
15
|
文件: src/ch5/section5.1/5.1.3/phase_wait/B.sv
task B::main_phase(uvm_phase phase);
    phase.raise_objection(this);
    `uvm_info("B", "main phase start", UVM_LOW)
    #200;
    `uvm_info("B", "main phase end", UVM_LOW)
    phase.drop_objection(this);
endtask
task B::post_main_phase(uvm_phase phase);
    phase.raise_objection(this);
    `uvm_info("B", "post main phase start", UVM_LOW)
    #200;
    `uvm_info("B", "post main phase end", UVM_LOW)
    phase.drop_objection(this);
endtask
|
env 代码:
 1
 2
 3
 4
 5
 6
 7
 8
 9
10
11
12
13
14
|
class my_env extends uvm_env;
   A   A_inst;
   B   B_inst;
   function new(string name = "my_env", uvm_component parent);
      super.new(name, parent);
   endfunction

   virtual function void build_phase(uvm_phase phase);
      super.build_phase(phase);
      A_inst = A::type_id::create("A_inst", this);
      B_inst = B::type_id::create("B_inst", this);
   endfunction
   `uvm_component_utils(my_env)
endclass
|
例程输出结果为:
 1
 2
 3
 4
 5
 6
 7
 8
 9
10
11
12
|
UVM_INFO @ 0: reporter [RNTST] Running test my_case0...
UVM_INFO /mnt/hgfs/plh_work/example_uvm/puvm/src/ch5/section5.1/5.1.3/phase_wait/A.sv(21) @ 0: uvm_test_top.env.A_inst [A] main phase start
UVM_INFO /mnt/hgfs/plh_work/example_uvm/puvm/src/ch5/section5.1/5.1.3/phase_wait/B.sv(15) @ 0: uvm_test_top.env.B_inst [B] main phase start
UVM_INFO /mnt/hgfs/plh_work/example_uvm/puvm/src/ch5/section5.1/5.1.3/phase_wait/A.sv(23) @ 100000: uvm_test_top.env.A_inst [A] main phase end
UVM_INFO /mnt/hgfs/plh_work/example_uvm/puvm/src/ch5/section5.1/5.1.3/phase_wait/B.sv(17) @ 200000: uvm_test_top.env.B_inst [B] main phase end
UVM_INFO /mnt/hgfs/plh_work/example_uvm/puvm/src/ch5/section5.1/5.1.3/phase_wait/A.sv(29) @ 200000: uvm_test_top.env.A_inst [A] post main phase start
UVM_INFO /mnt/hgfs/plh_work/example_uvm/puvm/src/ch5/section5.1/5.1.3/phase_wait/B.sv(23) @ 200000: uvm_test_top.env.B_inst [B] post main phase start
UVM_INFO /mnt/hgfs/plh_work/example_uvm/puvm/src/ch5/section5.1/5.1.3/phase_wait/B.sv(25) @ 400000: uvm_test_top.env.B_inst [B] post main phase end
UVM_INFO /mnt/hgfs/plh_work/example_uvm/puvm/src/ch5/section5.1/5.1.3/phase_wait/A.sv(31) @ 500000: uvm_test_top.env.A_inst [A] post main phase end
TEST CASE PASSED

--- UVM Report Summary ---
|
由上可知, A 的 main_phase 在 100 时刻已经执行完了, 但是并不是马上就要去执行 post_main_phase,
而是要等同一层次的B 的main_phase 也执行完之后才执行 post_main_phase
由于实例化是 A_inst = A::type_id::create("A_inst", this); B_inst = B::type_id::create("B_inst", this);
A_inst 的字典顺序排在 B_inst 所以是A 的phase 先执行
run_phase与post_shutdown_phase之间的同步
从整个验证平台的角度来说, 只有所有component的run_phase和post_shutdown_phase都完成才能进入extract_phase
A 代码:
 1
 2
 3
 4
 5
 6
 7
 8
 9
10
11
12
13
14
15
|
文件: src/ch5/section5.1/5.1.3/phase_wait2/A.sv
task A::post_shutdown_phase(uvm_phase phase);
    phase.raise_objection(this);
    `uvm_info("A", "post shutdown phase start", UVM_LOW)
    #300;
    `uvm_info("A", "post shutdown phase end", UVM_LOW)
    phase.drop_objection(this);
endtask
task A::run_phase(uvm_phase phase);
    phase.raise_objection(this);
    `uvm_info("A", "run phase start", UVM_LOW)
    #200;
    `uvm_info("A", "run phase end", UVM_LOW)
    phase.drop_objection(this);
endtask
|
1
2
3
4
5
6
7
|
UVM_INFO @ 0: reporter [RNTST] Running test my_case0...
UVM_INFO /mnt/hgfs/plh_work/example_uvm/puvm/src/ch5/section5.1/5.1.3/phase_wait2/A.sv(29) @ 0: uvm_test_top.env.A_inst [A] run phase start
UVM_INFO /mnt/hgfs/plh_work/example_uvm/puvm/src/ch5/section5.1/5.1.3/phase_wait2/A.sv(21) @ 0: uvm_test_top.env.A_inst [A] post shutdown phase start
UVM_INFO /mnt/hgfs/plh_work/example_uvm/puvm/src/ch5/section5.1/5.1.3/phase_wait2/A.sv(31) @ 200: uvm_test_top.env.A_inst [A] run phase end
UVM_INFO /home/user/example_uvm/uvm-1.1d/src/base/uvm_objection.svh(1267) @ 200: reporter [TEST_DONE] 'run' phase is ready to proceed to the 'extract' phase
UVM_INFO /mnt/hgfs/plh_work/example_uvm/puvm/src/ch5/section5.1/5.1.3/phase_wait2/A.sv(23) @ 300: uvm_test_top.env.A_inst [A] post shutdown phase end
TEST CASE PASSED
|
run_phase 不在那12 个按顺序执行的 phase 中, 所以与 post_shutdown_phase 是并行运行的
在上述代码中, post_shutdown_phase在300时刻完成, 而run_phase在200时刻完成。 验证平台进入extract_phase的时刻是300。
无论是run-time phase之间的同步, 还是run_phase与post_shutdown_phase之间的同步, 或者是run_phase与run_phase之间的同
步, 它们都与objection机制密切相关
UVM 树的遍历
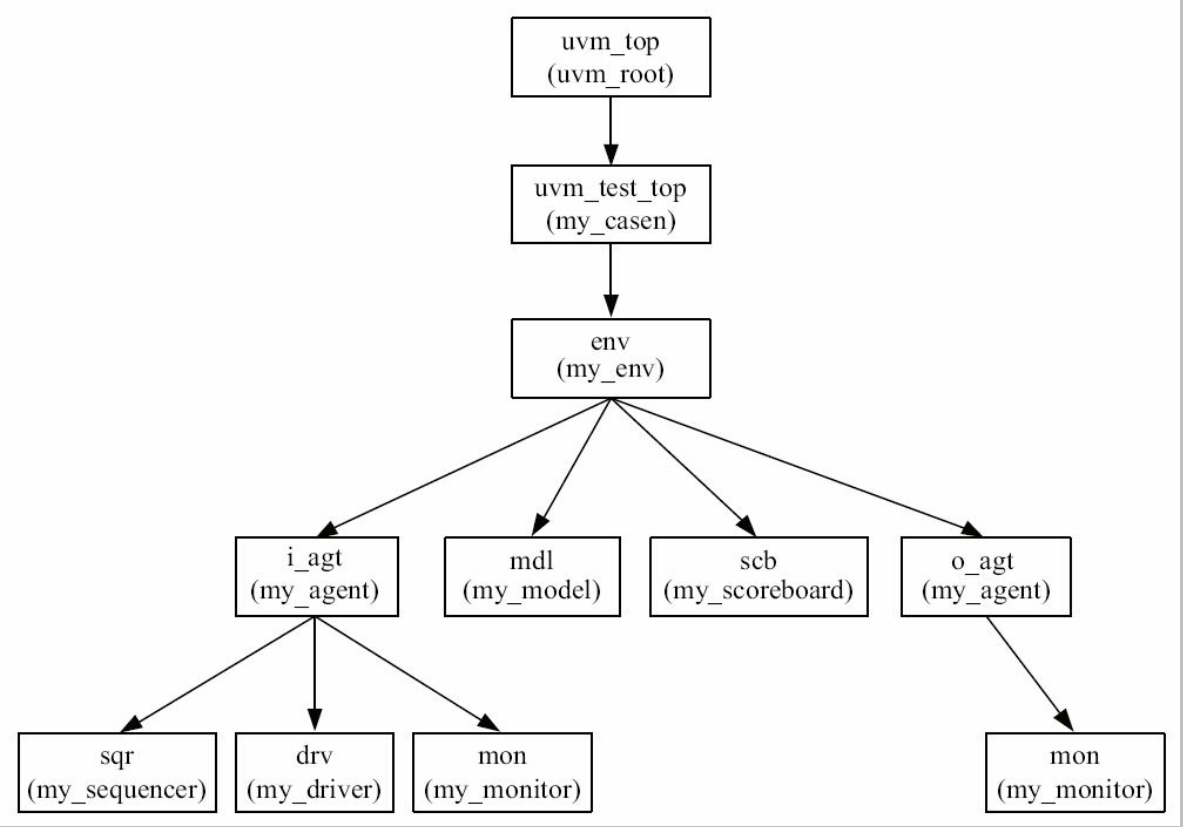
如my_scoreboard与my_driver, 从树的层次结构上来说, scoreboard级别是高于driver的,
但是, 这两者build_phase的执行顺序其实也是不确定的。 这两者的执行顺序除了字典序外, 还依赖于遍历树的方式:广度优先或是深度优先。
广度优先
指的是如果i_agt的build_phase执行完毕后, 接下来执行的是其兄弟component的build_phase, 当所有兄弟的
build_phase执行完毕后, 再执行其孩子的build_phase
深度优先
如果i_agt的build_phase执行完毕后, 它接下来执行的是其孩子的build_phase, 如果孩子还有孩子, 那么
再继续执行下去, 一直到整棵以i_agt为树根的UVM子树的build_phase执行完毕, 之后再执行i_agt的兄弟的build_phase
UVM中采用的是深度优先的原则
scoreboard及driver的build_phase的执行顺序, i_agt实例化时名字为“i_agt”, 而scb为“scb”, 那么i_agt的build_phase先执行,
在执行完毕后, 接下来执行driver、 monitor及sequencer的build_phase。 当全部执行完毕后再执行scoreboard的build_phase
1
2
3
4
|
# UVM_INFO my_agent.sv(29) @ 0: uvm_test_top.env.i_agt [agent] build_phase
# UVM_INFO my_driver.sv(16) @ 0: uvm_test_top.env.i_agt.drv [driver] build_phase
# UVM_INFO my_agent.sv(29) @ 0: uvm_test_top.env.o_agt [agent] build_phase
# UVM_INFO my_scoreboard.sv(23) @ 0: uvm_test_top.env.scb [scb] build_phase
|
反之, 如果i_agt实例化时是bbb, 而scb为aaa, 则会先执行scb的build_phase, 再执行i_agt的build_phase, 接下来是driver、
monitor及sequencer的build_phase
super.phase的内容
对于build_phase来说, uvm_component对其做的最重要的事情就是自动获取通过config_db::set设置的参数。
如果要关掉这个功能, 可以在自己的build_phase中不调用super.build_phase
其他phase 的原型如下:
 1
 2
 3
 4
 5
 6
 7
 8
 9
10
11
12
13
14
15
16
17
18
19
20
21
22
23
24
25
26
27
28
29
30
31
32
33
34
35
36
37
38
39
40
41
42
43
44
45
46
47
48
|
function void uvm_component::connect_phase(uvm_phase phase);
    connect();
    return;
endfunction
function void uvm_component::start_of_simulation_phase(uvm_phase phase);
    start_of_simulation();
    return;
endfunction
function void uvm_component::end_of_elaboration_phase(uvm_phase phase);
    end_of_elaboration();
    return;
endfunction
task uvm_component::run_phase(uvm_phase phase);
    run();
    return;
endtask
function void uvm_component::extract_phase(uvm_phase phase);
    extract();
    return;
endfunction
function void uvm_component::check_phase(uvm_phase phase);
    check();
    return;
endfunction
function void uvm_component::report_phase(uvm_phase phase);
    report();
    return;
endfunction
function void uvm_component::connect(); return; endfunction
function void uvm_component::start_of_simulation(); return; endfunction
function void uvm_component::end_of_elaboration(); return; endfunction
task uvm_component::run(); return; endtask
function void uvm_component::extract(); return; endfunction
function void uvm_component::check(); return; endfunction
function void uvm_component::report(); return; endfunction
function void uvm_component::final_phase(uvm_phase phase); return; endfunction
task uvm_component::pre_reset_phase(uvm_phase phase); return; endtask
task uvm_component::reset_phase(uvm_phase phase); return; endtask
task uvm_component::post_reset_phase(uvm_phase phase); return; endtask
task uvm_component::pre_configure_phase(uvm_phase phase); return; endtask
task uvm_component::configure_phase(uvm_phase phase); return; endtask
task uvm_component::post_configure_phase(uvm_phase phase); return; endtask
task uvm_component::pre_main_phase(uvm_phase phase); return; endtask
task uvm_component::main_phase(uvm_phase phase); return; endtask
task uvm_component::post_main_phase(uvm_phase phase); return; endtask
task uvm_component::pre_shutdown_phase(uvm_phase phase); return; endtask
task uvm_component::shutdown_phase(uvm_phase phase); return; endtask
task uvm_component::post_shutdown_phase(uvm_phase phase); return; endtask
|
由如上代码可以看出, 除build_phase外, 在写其他phase时, 完全可以不必加上super.xxxx_phase语句
当然, 这个结论只适用于直接扩展自uvm_component的类。 如果是扩展自用户自定义的类, 如 base_test类,
且在其某个phase, 如connect_phase中定义了一些重要内容, 那么在具体测试用例的connect_phase中就不应该省略 super.connect_phase
build阶段出现UVM_ERROR停止仿真
my_driver.sv 代码:
1
2
3
4
5
6
7
|
文件: src/ch5/section5.1/5.1.6/my_driver.sv
virtual function void build_phase(uvm_phase phase);
    super.build_phase(phase);
    if(!uvm_config_db#(virtual my_if)::get(this, "", "vif", vif))
        `uvm_fatal("my_driver", "virtual interface must be set for vif!!!")
    `uvm_error("my_driver", "UVM_ERROR test")
endfunction
|
运行结果如下:
1
2
|
# UVM_ERROR my_driver.sv(16) @ 0: uvm_test_top.env.i_agt.drv [my_driver] UVM_ERROR test
# UVM_FATAL @ 0: reporter [BUILDERR] stopping due to build errors
|
这里给出的uvm_fatal是UVM内部自定义的。 在end_of_elaboration_phase及其前的phase中,
如果出现了一个或多个 UVM_ERROR, 那么UVM就认为出现了致命错误, 会调用uvm_fatal结束仿真。
UVM的这个特性在小型设计中体现不出优势, 但是在大型设计中, 这一特性非常有用。 大型设计中, 真正仿真前的编译、 优化可能会花费一个多小时的时间。 完成编译、 优化后开始仿真, 几秒钟后, 出现一个uvm_fatal就停止仿真。当修复了这个问题 后, 再次重新运行, 发现又有一个uvm_fatal出现。 如此反复, 可能会耗费大量时间。 但是如果将这些uvm_fatal替换为uvm_error, 将所有类似的问题一次性暴露出来, 一次性修复, 这会极大缩减时间, 提高效率
phase的跳转
在之前的所有表述中, 各个phase都是顺序执行的, 前一个phase执行完才执行后一个。 但是并没有介绍过当后一个phase执行
后还可以再执行一次前面的phase。 而“跳转”这个词则完全打破了这种观念: phase之间可以互相跳来跳去
phase的跳转是比较高级的功能, 这里仅举一个最简单的例子, 实现main_phase到reset_phase的跳转
假如在验证平台中监测到reset_n信号为低电平, 则马上从main_phase跳转到reset_phase。 driver的代码如下:
 1
 2
 3
 4
 5
 6
 7
 8
 9
10
11
12
13
14
15
16
17
18
19
20
21
22
23
24
|
文件: src/ch5/section5.1/5.1.7/my_driver.sv
    task my_driver::reset_phase(uvm_phase phase);
        phase.raise_objection(this);
        `uvm_info("driver", "reset phase", UVM_LOW)
        vif.data <= 8'b0;
        vif.valid <= 1'b0;
        while(!vif.rst_n)
            @(posedge vif.clk);
        phase.drop_objection(this);
    endtask
task my_driver::main_phase(uvm_phase phase);
    `uvm_info("driver", "main phase", UVM_LOW)
    fork
        while(1) begin
            seq_item_port.get_next_item(req);
            drive_one_pkt(req);
            seq_item_port.item_done();
        end
        begin
            @(negedge vif.rst_n);
            phase.jump(uvm_reset_phase::get());
        end
    join
endtask
|
reset_phase主要做一些清理工作, 并等待复位完成。 main_phase中一旦监测到reset_n为低电平, 则马上跳转到reset_phase
top_tb 中 控制复位信号代码如下:
 1
 2
 3
 4
 5
 6
 7
 8
 9
10
|
文件: src/ch5/section5.1/5.1.7/top_tb.sv
initial begin
    rst_n = 1'b0;
    #1000;
    rst_n = 1'b1;
    #3000;
    rst_n = 1'b0;
    #3000;
    rst_n = 1'b1;
end
|
在my_case中控制objection代码如下:
 1
 2
 3
 4
 5
 6
 7
 8
 9
10
|
文件: src/ch5/section5.1/5.1.7/my_case0.sv
task my_case0::reset_phase(uvm_phase phase);
    `uvm_info("case0", "reset_phase", UVM_LOW)
endtask
task my_case0::main_phase(uvm_phase phase);
    phase.raise_objection(this);
    `uvm_info("case0", "main_phase", UVM_LOW)
    #10000;
    phase.drop_objection(this);
endtask
|
运行上述例子输出为:
 1
 2
 3
 4
 5
 6
 7
 8
 9
10
11
12
13
14
|
UVM_INFO @ 0: reporter [RNTST] Running test my_case0...
UVM_INFO /mnt/hgfs/plh_work/example_uvm/puvm/src/ch5/section5.1/5.1.7/my_driver.sv(25) @ 0: uvm_test_top.env.i_agt.drv [driver] reset phase
UVM_INFO /mnt/hgfs/plh_work/example_uvm/puvm/src/ch5/section5.1/5.1.7/my_case0.sv(15) @ 0: uvm_test_top [case0] reset_phase
UVM_INFO /mnt/hgfs/plh_work/example_uvm/puvm/src/ch5/section5.1/5.1.7/my_driver.sv(34) @ 1100000: uvm_test_top.env.i_agt.drv [driver] main phase
UVM_INFO /mnt/hgfs/plh_work/example_uvm/puvm/src/ch5/section5.1/5.1.7/my_case0.sv(20) @ 1100000: uvm_test_top [case0] main_phase
UVM_INFO /home/user/example_uvm/uvm-1.1d/src/base/uvm_phase.svh(1311) @ 4000000: reporter [PH_JUMP] phase main (schedule uvm_sched, domain uvm) is jumping to phase reset
UVM_WARNING @ 4000000: main_objection [OBJTN_CLEAR] Object 'uvm_top' cleared objection counts for main_objection
UVM_INFO /mnt/hgfs/plh_work/example_uvm/puvm/src/ch5/section5.1/5.1.7/my_driver.sv(25) @ 4000000: uvm_test_top.env.i_agt.drv [driver] reset phase
UVM_INFO /mnt/hgfs/plh_work/example_uvm/puvm/src/ch5/section5.1/5.1.7/my_case0.sv(15) @ 4000000: uvm_test_top [case0] reset_phase
UVM_INFO /mnt/hgfs/plh_work/example_uvm/puvm/src/ch5/section5.1/5.1.7/my_driver.sv(34) @ 7100000: uvm_test_top.env.i_agt.drv [driver] main phase
UVM_INFO /mnt/hgfs/plh_work/example_uvm/puvm/src/ch5/section5.1/5.1.7/my_case0.sv(20) @ 7100000: uvm_test_top [case0] main_phase
TEST CASE PASSED

--- UVM Report Summary ---
|
很明显, 整个验证平台都从main_phase跳转到了reset_phase。 在上述运行结果中, 出现了一个UVM_WARNING。 这是因为在
my_driver中调用jump时, 并没有把my_case0中提起的objection进行撤销。
跳转中最难的地方在于跳转前后的清理和准备工作。 如上面的运行结果中的警告信息就是因为没有及时对objection进行清
理。 对于scoreboard来说, 这个问题可能尤其严重。 在跳转前, scoreboard的expect_queue中的数据应该清空, 同时要容忍跳转后
DUT可能输出一些异常数据
在my_driver中使用了jump函数, 它的原型是:
1
|
function void uvm_phase::jump(uvm_phase phase);
|
jump 函数的参数
jump函数的参数必须是一个uvm_phase类型的变量。 在UVM中, 这样的变量共有如下几个
 1
 2
 3
 4
 5
 6
 7
 8
 9
10
11
12
13
14
15
16
17
18
19
20
21
22
|
uvm_build_phase::get();
uvm_connect_phase::get();
uvm_end_of_elaboration_phase::get();
uvm_start_of_simulation_phase::get();
uvm_run_phase::get();
uvm_pre_reset_phase::get();
// 之后的phase 才可以作为 jump 的参数
uvm_reset_phase::get();
uvm_post_reset_phase::get();
uvm_pre_configure_phase::get();
uvm_configure_phase::get();
uvm_post_configure_phase::get();
uvm_pre_main_phase::get();
uvm_main_phase::get();
uvm_post_main_phase::get();
uvm_pre_shutdown_phase::get();
uvm_shutdown_phase::get();
uvm_post_shutdown_phase::get();
uvm_extract_phase::get();
uvm_check_phase::get();
uvm_report_phase::get();
uvm_final_phase::get();
|
但并不是所有的phase都可以作为jump的参数, 只有 uvm_pre_reset_phase::get() 后的所有phase都可以
即只能在动态运行的phase 中跳转
phase 机制的必要性
在不同时间做不同的事情, 这就是UVM中phase的设计哲学。
phase的引入在很大程度上解决了因代码顺序杂乱可能会引发的问题。 遵循UVM的代码顺序划分原则( 如build_phase做实例化工作, connect_phase做连接工作等) , 可以在很大程度上减少验证平台开发者的工作量, 使其从一部分杂乱的工作中解脱出来
phase 的调试
UVM提供命令行参数UVM_PHASE_TRACE来对phase机制进行调试, 其使用方式为
1
|
<sim command> +UVM_PHASE_TRACE
|
超时退出
在验证平台运行时, 有时测试用例会出现挂起( hang up) 的情况。 在这种状态下, 仿真时间一直向前走, driver或者monitor
并没有发出或者收到transaction, 也没有UVM_ERROR出现。 一个测试用例的运行时间是可以预计的, 如果超出了这个时间, 那么
通常就是出错了。
set_timeout 函数
在UVM中通过uvm_root的set_timeout函数可以设置超时时间:
1
2
3
4
5
6
|
文件: src/ch5/section5.1/5.1.10/base_test.sv
function void base_test::build_phase(uvm_phase phase);
    super.build_phase(phase);
    env = my_env::type_id::create("env", this);
    uvm_top.set_timeout(500ns, 0);
endfunction
|
set_timeout函数有两个参数,
第一个参数是要设置的时间,
第二个参数表示此设置是否可以被其后的其他set_timeout语句覆盖。
如上的代码将超时的时间定为500ns。 如果达到500ns时, 测试用例还没有运行完毕, 则会给出一条uvm_fatal的提示信息, 并退出仿真
默认的超时退出时间是9200s, 是通过宏UVM_DEFAULT_TIMEOUT来指定的:
1
|
`define UVM_DEFAULT_TIMEOUT 9200s
|
命令行中设置
除了可以在代码中设置超时退出时间外, 还可以在命令行中设置:
1
|
<sim command> +UVM_TIMEOUT=<timeout>,<overridable>
|
其中timeout是要设置的时间, overridable表示能否被覆盖, 其值可以是YES或者NO。 如将超时退出时间设置为300ns, 且可以被覆盖, 代码如下:
1
|
<sim command> +UVM_TIMEOUT="300ns, YES"
|
objection 机制
run-time 的phase 需要有 objection 才能运行
objection字面的意思就是反对、 异议。 在验证平台中, 可以通过drop_objection来通知系统可以关闭验证平台。 当然, 在撤销
之前首先要raise_objection。 想象一下, 如果读者与别人交流时事先并没有提出异议, 然后忽然说: 我撤销刚才的反对意见
( objection) 。 那么, 事先并没有提出任何反对意见的你一定会令对方迷惑不已, 所以, 为了良好的沟通, 在drop_objection之
前, 一定要先raise_objection:
1
2
3
4
5
|
task main_phase(uvm_phase phase);
phase.raise_objection(this);
…
phase.drop_objection(this);
endtask
|
在进入到某一phase时, UVM会收集此phase提出的所有objection, 并且实时监测所有objection是否已经被撤销了, 当发现所有都已经撤销后, 那么就会关闭此phase, 开始进入下一个phase。 当所有的phase都执行完毕后, 就会调用$finish来将整个的验证平台关掉。
如果UVM发现此phase没有提起任何objection, 那么将会直接跳转到下一个phase中。 假如验证平台中只有( 注意“只有”两个
字) driver中提起了异议, 而monitor等都没有提起, 代码如下所示:
 1
 2
 3
 4
 5
 6
 7
 8
 9
10
|
task driver::main_phase(uvm_phase phase);
    phase.raise_objection(this);
    #100;
    phase.drop_objection(this);
endtask
task monitor::main_phase(uvm_phase phase);
    while(1) begin
        …
    end
endtask
|
上述代码, 假设只有 driver 中有 raise_objection 那么 monitor 的 main_phase 虽然可以执行, 但是也只能执行100 个时间单位,
当 driver 中 drop_objection 之后, 此时, UVM 监测发现所有的objection都被撤销了( 因为只有driver raise_objection) ,
于是UVM会直接“杀死”monitor中的无限循环进程, 并跳到下一个phase, 即post_main_phase( ), 假设进入main_phase的时刻为0,
那么进入post_main_phase的时刻就为100。
假设 driver 变成如下情况:
1
2
3
|
task driver::main_phase(uvm_phase phase);
    #100;
endtask
|
那么在进入main_phase时, UVM发现没有任何objection被提起, 于是虽然driver中有一个延时100个单位时间的代码, monitor
中有一个无限循环, UVM也都不理会, 它会直接跳转到post_main_phase, 假设进入main_phase的时刻为0, 那么进入
post_main_phase的时刻还是为0。 UVM用户一定要注意: 如果想执行一些耗费时间的代码, 那么要在此phase下任意一个component
中至少提起一次objection。
run-phase 不需要 objection 都可以运行
 1
 2
 3
 4
 5
 6
 7
 8
 9
10
11
12
|
文件: src/ch5/section5.2/5.2.1/objection1/my_case0.sv
task my_case0::main_phase(uvm_phase phase);
    phase.raise_objection(this);
    #50;
    phase.drop_objection(this);
endtask
task my_case0::run_phase(uvm_phase phase);
    for(int i = 0; i < 9; i++) begin
        #10;
        `uvm_info("case0", "run_phase is executed", UVM_LOW)
    end
endtask
|
在上述代码运行结果中, 可以看到“run_phase is executed”被输出了5次。
因为第50 个单位时间后 main_phase 执行了 drop_objection 此时uvm 中没有其他异议的话, run_phase 会被强制退出
反之, 如果上述run_phase与main_phase中的内容互换:
 1
 2
 3
 4
 5
 6
 7
 8
 9
10
11
12
|
文件: src/ch5/section5.2/5.2.1/objection2/my_case0.sv
task my_case0::main_phase(uvm_phase phase);
    for(int i = 0; i < 9; i++) begin
        #10;
        `uvm_info("case0", "main_phase is executed", UVM_LOW)
    end
endtask
task my_case0::run_phase(uvm_phase phase);
    phase.raise_objection(this);
    #100;
    phase.drop_objection(this);
endtask
|
则不会有任何“main_phase is executed”输出,
因此, 对于run_phase 来说, 有两种选择可以使其中的代码运行:
- 第一是其他动态运行的phase中有objection被提起。 在这种情况下, 运行时间受其他动态运行phase中objection控制, run_phase 只能被动地接受
- 第二是在run_phase中raise_objection。 这种情况下运行时间完全受run_phase控制。
参数phase的必要性
在UVM中所有phase的函数/任务参数中, 都有一个phase:
1
|
task main_phase(uvm_phase phase);
|
因为要便于在任何component的main_phase中都能raise_objection, 而要raise_objection则必须通过phase.raise_objection来完成,
所以必须将 phase作为参数传递到main_phase等任务中。可以想象, 如果没有这个phase参数, 那么想要提起一个objection就会比较麻烦了
这里比较有意思的一个问题是: 类似build_phase等function phase是否可以提起和撤销objection呢?
1
2
3
4
5
6
|
文件: src/ch5/section5.2/5.2.2/my_case0.sv
function void my_case0::build_phase(uvm_phase phase);
    phase.raise_objection(this);
    super.build_phase(phase);
    phase.drop_objection(this);
endfunction
|
运行上述代码后系统并不会报错。 不过, 一般不会这么用。 phase的引入是为了解决何时结束仿真的问题, 它更多面向
main_phase等task phase, 而不是面向function phase。
控制objection的最佳选择
一般来说, 在一个实际的验证平台中, 通常会在以下两种objection的控制策略中选择一种:
第一种是在scoreboard中进行控制。
在2.3.6节中, scoreboard的main_phase被做成一个无限循环。 如果要在scoreboard中控制
objection, 则需要去除这个无限循环, 通过config_db::set的方式设置收集到的transaction的数量pkt_num, 当收集到足够数量的
transaction后跳出循环:
 1
 2
 3
 4
 5
 6
 7
 8
 9
10
11
12
13
14
|
task my_scoreboard::main_phase(uvm_phase phase);
    phase.raise_objection(this);
    fork
        while (1) begin
            exp_port.get(get_expect);
            expect_queue.push_back(get_expect);
        end
        for(int i = 0; i < pkt_num; i++) begin
            act_port.get(get_actual);
            …
        end
    join_any
    phase.drop_objection(this);
endtask
|
上述代码中将原本的 fork...join 语句改为了 fork...join_any 。 当收集到足够的transaction后, 第二个进程终结,
从而跳出 fork…join_any, 执行drop_objection语句。
fork…join_any 里面的代码并行执行, 当运行到 join_any 后会跳出
第二种, 如在第2章中介绍的例子那样, 在sequence中提起sequencer的objection, 当sequence完成后, 再撤销此objection。
以上两种方式在验证平台中都有应用。 其中用得最多的是第二种, 这种方式是UVM提倡的方式。
UVM的设计哲学就是全部由sequence来控制激励的生成, 因此一般情况下只在sequence中控制objection。
set_drain_time的使用
无论任何功能的模块, 都有其处理延时。 如图5-5a所示, 0时刻DUT开始接收输入, 直到p时刻才有数据输出。

在sequence中, n时刻发送完毕最后一个transaction, 如果此时立刻drop_objection, 那么最后在n+p时刻DUT输出的包将无法接
收到。 因此, 在sequence中, 最后一个包发送完毕后, 要延时p时间才能drop_objection:
 1
 2
 3
 4
 5
 6
 7
 8
 9
10
|
virtual task body();
    if(starting_phase != null)
        starting_phase.raise_objection(this);
    repeat (10) begin
        `uvm_do(m_trans)
    end
    #100;
    if(starting_phase != null)
        starting_phase.drop_objection(this);
endtask
|
UVM为所有的objection设置了drain_time这一属性。 所谓drain_time, 用5.2.1节中最后的例子来说, 就是当所
有的僵尸都被消灭后, UVM植物并不马上进入下一层, 而是等待一段时间, 在这段时间内, 那些正在运行的机器依然在正常地运
转, 时间一到才会进入下一层。 drain_time的设置方式为:
1
2
3
4
|
文件: src/ch5/section5.2/5.2.4/base_test.sv
task base_test::main_phase(uvm_phase phase);
    phase.phase_done.set_drain_time(this, 200);
endtask
|
phase_done是uvm_phase内定义的一个成员变量:
1
|
uvm_objection phase_done; // phase done objection
|
当调用phase.raise_objection或者phase.drop_objection时, 其实质是调用phase_done的raise_objection和drop_objection。 当UVM在
main_phase检测到所有的objection被撤销后, 接下来会检查有没有设置drain_time。 如果没有设置, 则马上进入到
post_main_phase, 否则延迟drain_time后再进入post_main_phase。 如果在post_main_phase及其后都没有提起objection, 那么最终会
前进到final_phase, 结束仿真。
为了检测drain_time的效果, 在case0_sequence中使用uvm_info打印出drop_objection:
 1
 2
 3
 4
 5
 6
 7
 8
 9
10
11
|
文件: src/ch5/section5.2/5.2.4/my_case0.sv
class case0_sequence extends uvm_sequence #(my_transaction);
    …
    virtual task body();
        …
        #10000;
        `uvm_info("case0_sequence", "drop objection", UVM_LOW)
        …
    endtask
    …
endclass
|
同时在my_case0中打印出进入post_main_phase和final_phase的时间:
1
2
3
4
5
6
7
|
文件: src/ch5/section5.2/5.2.4/my_case0.sv
task my_case0::post_main_phase(uvm_phase phase);
    `uvm_info("my_case0", "enter post_main phase", UVM_LOW)
endtask
function void my_case0::final_phase(uvm_phase phase);
    `uvm_info("my_case0", "enter final phase", UVM_LOW)
endfunction
|
运行结果:
1
2
3
4
5
|
UVM_INFO @ 0: reporter [RNTST] Running test my_case0...
UVM_INFO /mnt/hgfs/plh_work/example_uvm/puvm/src/ch5/section5.2/5.2.4/my_case0.sv(14) @ 10000: uvm_test_top.env.i_agt.sqr@@case0_sequence [case0_sequence] drop objection
UVM_INFO /mnt/hgfs/plh_work/example_uvm/puvm/src/ch5/section5.2/5.2.4/my_case0.sv(45) @ 10200: uvm_test_top [my_case0] enter post_main phase
TEST CASE PASSED
UVM_INFO /mnt/hgfs/plh_work/example_uvm/puvm/src/ch5/section5.2/5.2.4/my_case0.sv(49) @ 10200: uvm_test_top [my_case0] enter final phase
|
可以看到在10000时刻drop_objection, 但是直到10200时刻才进入post_main_phase, 两者之间的时间差200恰恰就是在base_test 中设置的drain_time
drain_time属于uvm_objection的一个特性。 如果只在main_phase中调用set_drain_time函数设置drain_time, 但是在其他phase, 如
configure_phase中没有设置, 那么在configure_phase中所有的objection被撤销后, 会立即进入post_configure_phase。 换言之, 一个
phase对应一个drain_time, 并不是所有的phase共享一个drain_time。 在没有设置的情况下, drain_time的默认值为0。
objection 的调试
与phase的调试一样, UVM同样提供了命令行参数来进行objection的调试:
1
|
<sim command> +UVM_OBJECTION_TRACE
|
对上一节的例子, 加入命令行参数后的部分输出如下:
 1
 2
 3
 4
 5
 6
 7
 8
 9
10
11
12
|
UVM_INFO @ 0: main_objection [OBJTN_TRC] Object uvm_test_top.env.i_agt.sqr.case0_sequence raised 1 objection(s): count=1  total=1
UVM_INFO @ 0: main_objection [OBJTN_TRC] Object uvm_test_top.env.i_agt.sqr added 1 objection(s) to its total (raised from source object ): count=0  total=1
UVM_INFO @ 0: main_objection [OBJTN_TRC] Object uvm_test_top.env.i_agt added 1 objection(s) to its total (raised from source object ): count=0  total=1
UVM_INFO @ 0: main_objection [OBJTN_TRC] Object uvm_test_top.env added 1 objection(s) to its total (raised from source object ): count=0  total=1
UVM_INFO @ 0: main_objection [OBJTN_TRC] Object uvm_test_top added 1 objection(s) to its total (raised from source object uvm_test_top.env.i_agt.sqr.case0_sequence): count=0  total=1
UVM_INFO @ 0: main_objection [OBJTN_TRC] Object uvm_top added 1 objection(s) to its total (raised from source object uvm_test_top.env.i_agt.sqr.case0_sequence): count=0  total=1
UVM_INFO /mnt/hgfs/plh_work/example_uvm/puvm/src/ch5/section5.2/5.2.4/my_case0.sv(14) @ 10000: uvm_test_top.env.i_agt.sqr@@case0_sequence [case0_sequence] drop objection
UVM_INFO @ 10000: main_objection [OBJTN_TRC] Object uvm_test_top.env.i_agt.sqr.case0_sequence dropped 1 objection(s): count=0  total=0
UVM_INFO @ 10000: main_objection [OBJTN_TRC] Object uvm_test_top.env.i_agt.sqr.case0_sequence all_dropped 1 objection(s): count=0  total=0
UVM_INFO @ 10000: main_objection [OBJTN_TRC] Object uvm_test_top.env.i_agt.sqr subtracted 1 objection(s) from its total (dropped from source object ): count=0  total=0
UVM_INFO @ 10000: main_objection [OBJTN_TRC] Object uvm_test_top.env.i_agt.sqr subtracted 1 objection(s) from its total (all_dropped from source object ): count=0  total=0
...
|
在调用raise_objection时, count=1表示此次只提起了这一个objection。 可以使用如下的方式一次提起两个objection:
1
2
3
4
5
6
7
8
|
文件: src/ch5/section5.2/5.2.5/my_case0.sv
virtual task body();
    if(starting_phase != null)
        starting_phase.raise_objection(this, "case0 objection", 2);
    #10000;
    if(starting_phase != null)
        starting_phase.drop_objection(this, "case0 objection", 2);
endtask
|
raise_objection的第二个参数是字符串, 可以为空, 第三个参数为objection的数量。 drop_objection的后两个参数与此类似。 此
时, 加入UVM_OBJECTION_TRACE命令行参数的输出结果变为:
 1
 2
 3
 4
 5
 6
 7
 8
 9
10
11
|
UVM_INFO @ 0: reporter [RNTST] Running test my_case0...
UVM_INFO @ 0: main_objection [OBJTN_TRC] Object uvm_test_top.env.i_agt.sqr.case0_sequence raised 2 objection(s) (case0 objection): count=2  total=2
UVM_INFO @ 0: main_objection [OBJTN_TRC] Object uvm_test_top.env.i_agt.sqr added 2 objection(s) to its total (raised from source object , case0 objection): count=0  total=2
UVM_INFO @ 0: main_objection [OBJTN_TRC] Object uvm_test_top.env.i_agt added 2 objection(s) to its total (raised from source object , case0 objection): count=0  total=2
UVM_INFO @ 0: main_objection [OBJTN_TRC] Object uvm_test_top.env added 2 objection(s) to its total (raised from source object , case0 objection): count=0  total=2
UVM_INFO @ 0: main_objection [OBJTN_TRC] Object uvm_test_top added 2 objection(s) to its total (raised from source object uvm_test_top.env.i_agt.sqr.case0_sequence, case0 objection): count=0  total=2
UVM_INFO @ 0: main_objection [OBJTN_TRC] Object uvm_top added 2 objection(s) to its total (raised from source object uvm_test_top.env.i_agt.sqr.case0_sequence, case0 objection): count=0  total=2
UVM_INFO @ 10000: main_objection [OBJTN_TRC] Object uvm_test_top.env.i_agt.sqr.case0_sequence dropped 2 objection(s) (case0 objection): count=0  total=0
UVM_INFO @ 10000: main_objection [OBJTN_TRC] Object uvm_test_top.env.i_agt.sqr.case0_sequence all_dropped 2 objection(s) (case0 objection): count=0  total=0
UVM_INFO @ 10000: main_objection [OBJTN_TRC] Object uvm_test_top.env.i_agt.sqr subtracted 2 objection(s) from its total (dropped from source object , case0 objection): count=0  total=0
UVM_INFO @ 10000: main_objection [OBJTN_TRC] Object uvm_test_top.env.i_agt.sqr subtracted 2 objection(s) from its total (all_dropped from source object , case0 objection): count=0  total=0
|
这是因为UVM采用的是树形结构来管理所有的objection。 当有一个objection被提起后, 会检查从当前component一直到最顶层
的uvm_top的objection的数量。 上述输出结果中的total就是整个验证平台中所有活跃的( 被提起且没有被撤销的) objection的数
量。
domain的应用
domain是UVM中一个用于组织不同组件的概念。 先来看一个例子, 假设DUT分成两个相对独立的部分, 这两个独立的部分可
以分别复位、 配置、 启动, 但如果没有domain的概念, 那么这两块独立的部分则必须同时在reset_phase复位, 同时在
configure_phase配置, 同时进入main_phase开始正常工作。 这种协同性当然是没有问题的, 但是没有体现出独立性。
下图画出了这两个部分的driver位于同一domain的情况:
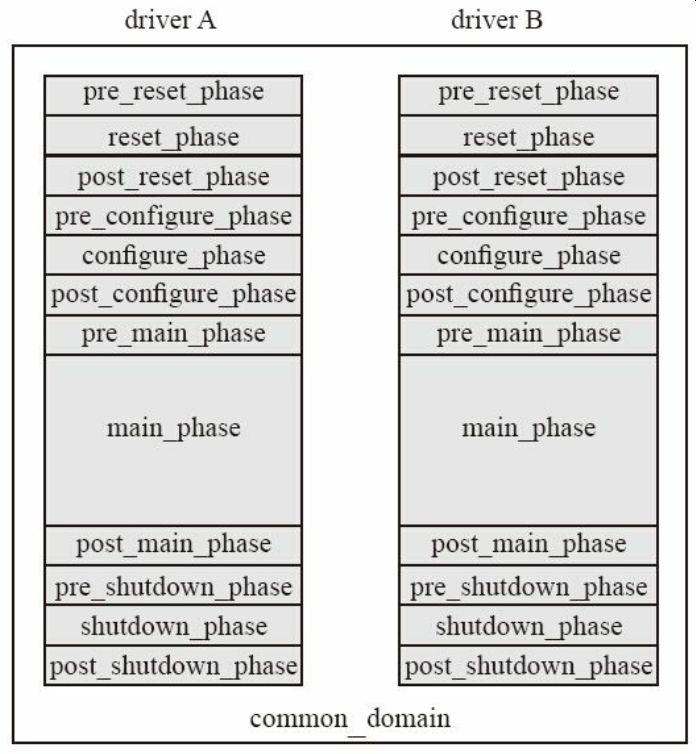
在默认情况下, 验证平台中所有component都位于一个名字为common_domain的domain中。 若要体现出独立性, 那么两个部分
的reset_phase、 configure_phae、 main_phase等就不应该同步。 此时就应该让其中的一部分从common_domain中独立出来,
使其位于不同的domain中。 下图列出了两个driver位于不同domain的情况:
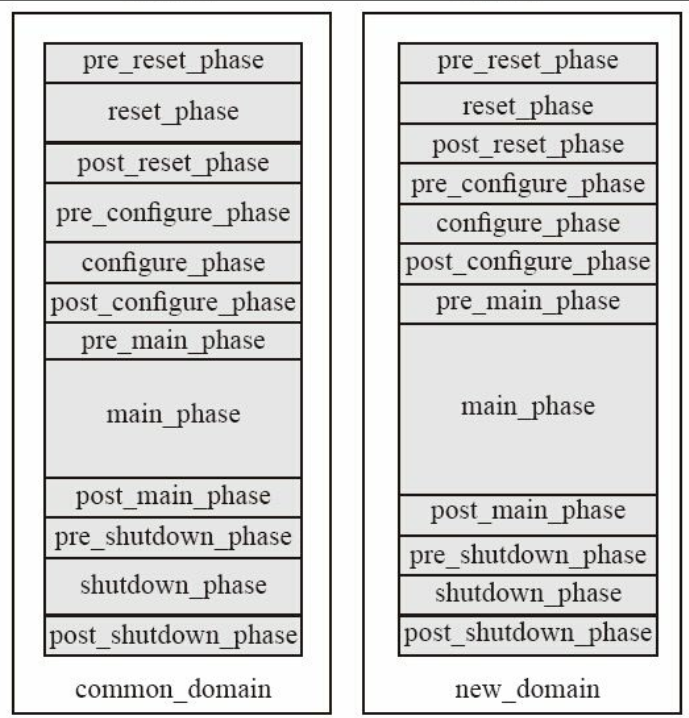
domain把两块时钟域隔开, 之后两个时钟域内的各个动态运行( run_time) 的phase就可以不必同步。
:@ 注意,这里domain只能隔离run-time的phase,对于其他phase,其实还是同步的,即两个domain的run_phase依然是同步的,其他的function phase也是同步的 。
多domain的例子
若将某个component置于某个新的domain中, 可以使用如下的方式:
 1
 2
 3
 4
 5
 6
 7
 8
 9
10
11
12
13
14
|
文件: src/ch5/section5.3/5.3.2/B.sv
class B extends uvm_component;
    uvm_domain new_domain;
    `uvm_component_utils(B)

    function new(string name, uvm_component parent);
        super.new(name, parent);
        new_domain = new("new_domain");
    endfunction
    virtual function void connect_phase(uvm_phase phase);
        set_domain(new_domain);
    endfunction
    …
endclass
|
在上述代码中, 新建了一个domain, 并将其实例化。 在connect_phase中通过set_domain将B加入到此domain中。 set_domain函数的原型是:
1
|
function void uvm_component::set_domain(uvm_domain domain, int hier=1);
|
其第二个参数表示是否递归调用, 如果为1, 则B及其子孙都将全部加入到new_domain中。 由于子孙的实例化一般在
build_phase中完成, 所以这里一般在connect_phase ( 因为 connect_phase 比 build_phase 后调用)中调用set_domain。
当B加入到new_domain后, 它与其他component( 默认位于common domain中) 的动态运行phase异步了。 在B中:
 1
 2
 3
 4
 5
 6
 7
 8
 9
10
11
12
13
14
15
16
17
18
19
|
文件: src/ch5/section5.3/5.3.2/B.sv
task B::reset_phase(uvm_phase phase);
    phase.raise_objection(this);
    `uvm_info("B", "enter into reset phase", UVM_LOW)
    #100;
    phase.drop_objection(this);
endtask
task B::post_reset_phase(uvm_phase phase);
    `uvm_info("B", "enter into post reset phase", UVM_LOW)
endtask
task B::main_phase(uvm_phase phase);
    phase.raise_objection(this);
    `uvm_info("B", "enter into main phase", UVM_LOW)
    #500;
    phase.drop_objection(this);
endtask
task B::post_main_phase(uvm_phase phase);
    `uvm_info("B", "enter into post main phase", UVM_LOW)
endtask
|
在A中:
 1
 2
 3
 4
 5
 6
 7
 8
 9
10
11
12
13
14
15
16
17
18
19
|
文件: src/ch5/section5.3/5.3.2/A.sv
task A::reset_phase(uvm_phase phase);
    phase.raise_objection(this);
    `uvm_info("A", "enter into reset phase", UVM_LOW)
    #300;
    phase.drop_objection(this);
endtask
task A::post_reset_phase(uvm_phase phase);
    `uvm_info("A", "enter into post reset phase", UVM_LOW)
endtask
task A::main_phase(uvm_phase phase);
    phase.raise_objection(this);
    `uvm_info("A", "enter into main phase", UVM_LOW)
    #200;
    phase.drop_objection(this);
endtask
task A::post_main_phase(uvm_phase phase);
    `uvm_info("A", "enter into post main phase", UVM_LOW)
endtask
|
在base_test中将A和B实例化:
 1
 2
 3
 4
 5
 6
 7
 8
 9
10
11
|
文件: src/ch5/section5.3/5.3.2/base_test.sv
class base_test extends uvm_test;
    A A_inst;
    B B_inst;
    …
endclass
function void base_test::build_phase(uvm_phase phase);
    super.build_phase(phase);
    A_inst = A::type_id::create("A_inst", this);
    B_inst = B::type_id::create("B_inst", this);
endfunction
|
运行上述代码后, 可以得到如下结果:
1
2
3
4
5
6
7
8
|
# UVM_INFO B.sv(20) @ 0: uvm_test_top.B_inst [B] enter into reset phase
# UVM_INFO A.sv(18) @ 0: uvm_test_top.A_inst [A] enter into reset phase
# UVM_INFO B.sv(26) @ 100: uvm_test_top.B_inst [B] enter into post reset phase
# UVM_INFO B.sv(31) @ 100: uvm_test_top.B_inst [B] enter into main phase
# UVM_INFO A.sv(24) @ 300: uvm_test_top.A_inst [A] enter into post reset phase
# UVM_INFO A.sv(29) @ 300: uvm_test_top.A_inst [A] enter into main phase
# UVM_INFO A.sv(35) @ 500: uvm_test_top.A_inst [A] enter into post main phase
# UVM_INFO B.sv(37) @ 600: uvm_test_top.B_inst [B] enter into post main phase
|
可以清晰地看到, A和B的动态运行phase已经完全异步了, 如果没有异步的话 , B 应该是在300 时刻才进入main_phase, A 和B 都在800 时刻进入 post_main_phase
多domain中phase的跳转
在 B 中:
 1
 2
 3
 4
 5
 6
 7
 8
 9
10
11
12
13
14
15
16
17
18
19
20
21
22
23
24
25
26
27
28
29
30
31
32
|
文件: src/ch5/section5.3/5.3.3/B.sv
class B extends uvm_component;
    uvm_domain new_domain;
    bit has_jumped;
    `uvm_component_utils(B)

    function new(string name, uvm_component parent);
        super.new(name, parent);
        new_domain = new("new_domain");
        has_jumped = 0;
    endfunction
    virtual function void connect_phase(uvm_phase phase);
        set_domain(new_domain);
    endfunction
    …
endclass
task B::reset_phase(uvm_phase phase);
    phase.raise_objection(this);
    `uvm_info("B", "enter into reset phase", UVM_LOW)
    #100;
    phase.drop_objection(this);
endtask
task B::main_phase(uvm_phase phase);
    phase.raise_objection(this);
    `uvm_info("B", "enter into main phase", UVM_LOW)
    #500;
    if(!has_jumped) begin
        phase.jump(uvm_reset_phase::get());
        has_jumped = 1'b1;
    end
    phase.drop_objection(this);
endtask
|
在A中:
 1
 2
 3
 4
 5
 6
 7
 8
 9
10
11
12
13
14
15
16
17
18
19
|
文件: src/ch5/section5.3/5.3.3/A.sv
    task A::reset_phase(uvm_phase phase);
        phase.raise_objection(this);
        `uvm_info("A", "enter into reset phase", UVM_LOW)
        #300;
        phase.drop_objection(this);
    endtask
task A::post_reset_phase(uvm_phase phase);
    `uvm_info("A", "enter into post reset phase", UVM_LOW)
endtask
task A::main_phase(uvm_phase phase);
    phase.raise_objection(this);
    `uvm_info("A", "enter into main phase", UVM_LOW)
    #200;
    phase.drop_objection(this);
endtask
task A::post_main_phase(uvm_phase phase);
    `uvm_info("A", "enter into post main phase", UVM_LOW)
endtask
|
在base_test中将A和B实例化:
 1
 2
 3
 4
 5
 6
 7
 8
 9
10
11
|
文件: src/ch5/section5.3/5.3.3/base_test.sv
class base_test extends uvm_test;
    A A_inst;
    B B_inst;
    …
endclass
function void base_test::build_phase(uvm_phase phase);
    super.build_phase(phase);
    A_inst = A::type_id::create("A_inst", this);
    B_inst = B::type_id::create("B_inst", this);
endfunction
|
由B的main_phase中跳转至reset_phase。 has_jumped控制着跳转只进行一次。 运行上述代码后, 可以得到如下结果:
1
2
3
4
5
6
7
8
9
|
# UVM_INFO B.sv(24) @ 0: uvm_test_top.B_inst [B] enter into reset phase
# UVM_INFO A.sv(18) @ 0: uvm_test_top.A_inst [A] enter into reset phase
# UVM_INFO B.sv(31) @ 100: uvm_test_top.B_inst [B] enter into main phase
# UVM_INFO A.sv(24) @ 300: uvm_test_top.A_inst [A] enter into post reset phase
# UVM_INFO A.sv(29) @ 300: uvm_test_top.A_inst [A] enter into main phase
# UVM_INFO A.sv(35) @ 500: uvm_test_top.A_inst [A] enter into post main phase
# UVM_INFO /home/landy/uvm/uvm-1.1d/src/base/uvm_phase.svh(1314) @ 600: reporter [PH_JUMP] phase main
# UVM_INFO B.sv(24) @ 600: uvm_test_top.B_inst [B] enter into reset phase
# UVM_INFO B.sv(31) @ 700: uvm_test_top.B_inst [B] enter into main phase
|
可以看到B两次进入了reset_phase和main_phase, 而A只进入了一次。 domain的应用使得phase的跳转可以只局限于验证平台的
一部分